I. Alternate Storage Location On Local Server
This assumes you have already setup a share from the install documentation and now want to change it.
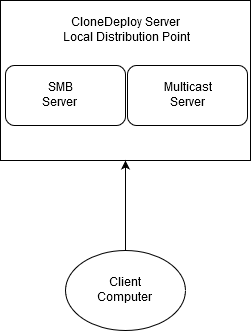 From the diagram, we can see that this setup is very simple. All traffic from the client computer goes directly to the CloneDeploy Server. The CloneDeploy Server is acting as both the SMB server and the Multicast server.
- Create a new directory at your desired location with a name of your choice. I will use /mystorage for this example.
- Inside that directory, create two more directories – images and resources
- You should now have a directory structure that includes /mystorage/images and /mystorage/resources
- Set permission:
chown -R www-data:cdsharewriters /mystorage
chmod -R 2775 /mystorage - Edit /etc/samba/smb.conf and update the path to /mystorage
- Restart samba – service smbd restart
- Open the CloneDeploy Web Interface and go to Admin -> Distribution Points
- Select View on the primary distribution point
- Update the physical path to your shared directory, in this example it would be /mystorage
- Click Update Distribution Point
II. Alternate Storage Location On Remote Server
A. Block Level (iSCSI , Fibre Channel)
Not much to this one, just mount the block device to your CloneDeploy server and follow the previous guide for Alternate Storage On Local Server. In this scenario CloneDeploy will still remain as the SMB server for your clients.
B. File Level (SMB)
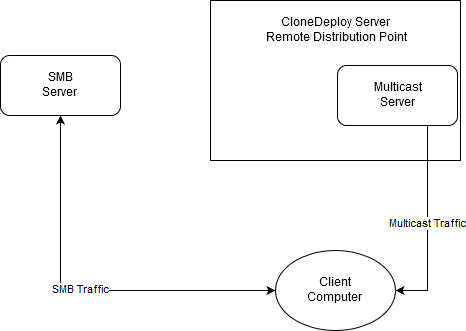 From this diagram we can see that setting up a Remote Distribution Point changes the behavior of the Client Computer. The Client Computer now connects directly to the remote SMB server, bypassing the CloneDeploy server. However, multicasts still connect to the CloneDeploy server. The CloneDeploy Application Server is unaware that the Distribution Point is Remote. When using Linux, the Distribution Point Location must ALWAYS be set to Local. The remote option uses native Windows libraries that don’t exist for Mono. We will work around this by mounting the remote share on the CloneDeploy server.
I cannot give exact advice on how on how to setup the remote share since they are so many different devices that can provide SMB services. Here is a generalization.
- Create a new SMB share on your remote NAS, SAN, File Server, etc.
- There should be two levels of access, a read only user and a read write user – this can sometimes be complicated to setup, if you cannot achieve this, a single read write user will work but isn’t recommended
- The share must have two sub directories – images and resources
- Get the Apache uid on your CloneDeploy server
id -u www-data - Install cifs-utils
apt-get install cifs-utils - Mount the share on your CloneDeploy server
mount -t cifs //[remote-ip]/[share-name] [destination] -o user=[write-user],pass=[write-user-password],uid=[apache-uid],dom=[domain]
Example: mount -t cifs //192.168.1.30/cd_images /remoteshare/ -o user=cd_share_rw,pass=write,uid=33,dom=workgroup - Open the CloneDeploy Web Interface and go to Admin -> Distribution Points
- Select View on the primary distribution point or create a new one, don’t forget to make it primary
- Update all fields to match the settings for your SMB share
- Set the Location to Local
- Update the Physical Path to the mounted share
- Click Update Distribution Point
- After all tests are done and successful, set the share to auto mount at startup, place the following example in /etc/fstab
//192.168.1.30/cd_images /remoteshare/ cifs user=cd_share_rw,pass=write,uid=33,dom=workgroup 0 0