Upgrade Path
CloneDeploy minor upgrades are incremental. Only 1.3.x can be directly upgraded to CloneDeploy 1.4.0.
Notices
- CloneDeploy 1.4.0 has removed installation support for 32-bit systems. If your CloneDeploy Server is not 64-bit, DO NOT attempt to upgrade.
- CloneDeploy 1.4.0 requires .NET 4.6 or newer. If you are not running .NET 4.6 or newer, you must install it prior to upgrading.
- CloneDeploy 1.4.0 has deprecated all macOS support and removed all features relating to Apple or Munki. In the unlikely event you are using CloneDeploy for Apple, you must not upgrade.
- The Linux Imaging Environment has changed. If you are using the client iso / usb, you must generate a new one after the upgrade.
- All Kernels prior to 4.18.5 will no longer work with CloneDeploy 1.4.0. Kernels 4.18.5, 4.20.10 and 5.0RC7 have been included.
Backup / Export Database
To export the existing database you will need your MariaDB root password. If you don’t remember it, it can be found in C:\Program Files (x86)\clonedeploy\application\Web.config. Look for the connection string line to see the password.
Open a cmd prompt as administrator and enter the following commands. (If your CloneDeploy version has been upgraded many times, your MariaDB version might be 10.1 and not 10.2)
cd "c:\Program Files (x86)\MariaDB 10.2\bin"
mysqldump.exe clonedeploy -u root -p > %userprofile%\Desktop\cd-sql-backup.sql -v
Enter your MariaDB root password when prompted
You should have the file cd-sql-backup.sql on your desktop, open it with a text editor to verify it’s not empty
Uninstall Existing MariaDB
Open control panel and go to uninstall a program
Select MariaDB 10.2 or 10.1 depending on your version and remove it.
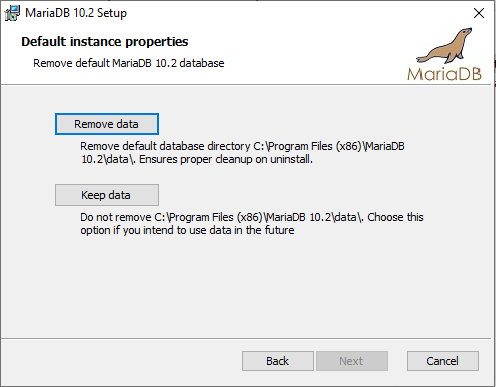
When asked to Remove data or Keep data, select Keep data. This isn’t really needed since we already exported the database, but doesn’t hurt either.
If prompted to close open applications, select close.
Uninstall Existing Tftp Server
Open a cmd prompt as administrator
cd "c:\Program Files (x86)\clonedeploy\tftpd32"
tftpd32_svc.exe -remove
Install CloneDeploy 1.4.0
Since CloneDeploy 1.4.0 is now 64-bit. It will install into program files instead of program files (x86). It will also install 64-bit versions of MariaDB and Tftp.
Download CloneDeploy 1.4.0 and run it.
You will be prompted for a MariaDB root password, you can use your old one or specify a new one.
You will also be prompted for the read only and read write SMB passwords, these don’t matter because the users already exist from the old installation and will not be overwritten. If you are installing on a server version, make sure the smb user passwords meet the complexity requirements, even though they aren’t being changed.
During installation, you will be prompted to overwrite the existing CloneDeploy IIS Web Application. Select Yes when prompted.
Restore Database
Open a cmd prompt as administrator and enter the following commands.
cd "c:\Program Files\MariaDB 10.3\bin"
mysql -u root -p
enter the root password when prompted that you used for the 1.4.0 installation
drop database clonedeploy;
create database clonedeploy;
quit
mysql -u root -p clonedeploy < %userprofile%\desktop\cd-sql-backup.sql
Apply Web Interface Settings Changes
Login to CloneDeploy with an admin account from your previous installation.
Click Update when prompted to update the database.
Select Admin Settings->Server
Update your Tftp Path to C:\Program Files\clonedeploy\tftpboot\
Click Update Server Settings
Select Admin Settings->Image Profile Updater
Ensure the New Kernel says 4.20.10×64
Check all image profiles
Click Update Image Profiles
Select Admin Settings->Boot Menu
Click Create Boot Files
Select Admin Settings->Distribution Points
Click View on each distribution point listed, if the physical path says C:\Program Files (x86)\clonedeploy\cd_dp\ then update it to C:\Program Files\clonedeploy\cd_dp\
If the distribution point lists a different directory then you have already moved it somewhere else and should not update the physical path.
Move Images / Fix Share
If in the last step, you needed to update the distribution point’s physical path to C:\Program Files\clonedeploy\cd_dp\ then you must also move your images to the new location.
Inside C:\Program Files (x86)\clonedeploy\cd_dp\ there are two folders, images and resources. Move those folders to C:\Program Files\clonedeploy\cd_dp\ and overwrite the existing empty images and resources folders.
Finally, when CloneDeploy 1.4.0 was installed, a share named cd_share was created at C:\Program Files\clonedeploy\cd_dp\. If you needed to update your distribution point’s physical path to C:\Program Files\clonedeploy\cd_dp\ then no further action is required, the share is setup in the right place and you have moved your images to the new location.
However, if you had a cd_share setup somewhere other than the default location of C:\Program Files (x86)\clonedeploy\cd_dp\ then it is now broken, because that share was removed and created at C:\Program Files\clonedeploy\cd_dp\ when 1.4.0 was installed.
You must disable the share located at C:\Program Files\clonedeploy\cd_dp\ and set the share back up at your original location before the upgrade. Remember to add the cd_share_rw and cd_share_ro users to the share.
If you had setup a custom share that was not named cd_share then no further action is required as it would not have been removed.
Fix ISO/USB Generation Bug
A bug in 1.4.0 has already been discovered that prevents the iso / usb generation from working properly. To fix:
Download http://files.clonedeploy.org/CloneDeploy-Services.dll
and place it in c:\program files\clonedeploy\application\bin , overwriting the original.

